Reset the used range in Mac Excel
This link on Debra Dalgleish site that show you how to reset the used range in Win Excel I posted or mail many times in all my years working with Excel to help other Excel users : https://www.contextures.com/xlfaqApp.html#Unused
Below I show you how to do it in Mac Excel and we are lucky because only the shortcut to select the last cell is different in Mac Excel.
Why do my scrollbars go to row 500 -- my data ends in cell E50?
Excel may be remembering some data that was in row 500, but has been deleted. Or you have format some cells in a part of the worksheet that you not use anymore. To go to the cell in Win Excel which is currently the "Last Cell" in the worksheet, hold the Ctrl key, and press the End key. In Mac Excel you must use the shortcut Fn + Control + > (Right arrow) to select the last cell in the worksheet. If the Last Cell is outside the range of cells that is actually being used, you can reset the used range, so the scroll bar works correctly and to make the file size smaller.
Excel may be remembering some data that was in row 500, but has been deleted. Or you have format some cells in a part of the worksheet that you not use anymore. To go to the cell in Win Excel which is currently the "Last Cell" in the worksheet, hold the Ctrl key, and press the End key. In Mac Excel you must use the shortcut Fn + Control + > (Right arrow) to select the last cell in the worksheet. If the Last Cell is outside the range of cells that is actually being used, you can reset the used range, so the scroll bar works correctly and to make the file size smaller.
Manually reset the used range:
Step 1: First select the last cell that contains data of your worksheet
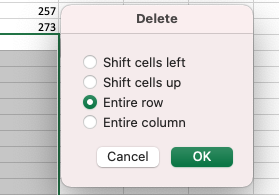
To delete any unused rows:
- Move down one row from the last cell with data.
- Hold the Ctrl and Shift keys, and press the Down Arrow key
- Right-click in the selected cells, and, from the shortcut menu, choose Delete
- Select Entire Row, click OK.
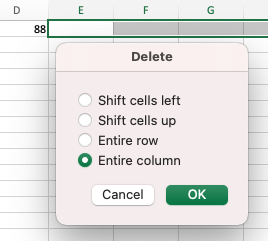
To delete any unused columns:
- Move right one column from the last cell with data.
- Hold the Ctrl and Shift keys, and press the Right Arrow key
- Right-click in the selected cells, and, from the shortcut menu, choose Delete
- Select Entire Column, click OK.
Save the file. Use the shortcut Fn + Control + > now to check if the used range is reset in your worksheet, you can repeat the steps above for all worksheets in your workbook.
Note: In very old Excel versions it is possible that you must save/close/reopen the file to see the results