Change the Ribbon in Mac Excel with RibbonX
Note : Update Mac Office first and be sure it is 15.17 or higher, in the 15.17 update Ribbon customisation via Ribbon XML is enabled by default for all customers.
Differents between Win Excel and Mac Excel
If you open workbooks or add-ins in Win or Mac Excel with RibbonX to customise the Ribbon be aware that you can see different results or notice that things are not working in Mac Excel. Seems that Microsoft does not have the resources to make it work the same on both platforms.
Things we must do and understand before we start
Important: The way to add RibbonX to Excel files or add-ins is to do it on a Windows machine.
Note: The information below assume you develop on a Windows machine
If you want to add RibbonX to Excel workbooks that will be used in Windows and/or Mac then I suggest you download and install the free Office RibbonX Editor created by Fernando Andreu to make this a lot easier: https://github.com/fernandreu/office-ribbonx-editor/releases/latest
Before Fernando Andreu released this tool, we used a tool named Custom UI Editor created by Trang Luu, but I suggest that you now use the new tool that Fernando Andreu created that is up to date.
The Office RibbonX Editor gives you an option to insert a customUI.xml file in your Excel workbook that loads when you open your file in Excel 2007 and higher for Windows and Excel 2016 and higher for the Mac and/or a customUI14.xml file that only loads when you open the Excel workbook in Excel 2010 and higher for Windows and Excel 2016 and higher for the Mac. What, files that are inside an Excel file?. Excel files are really zip files so if you change the extension to zip and open the file in your zip program you see that there are a few folders and a file inside the zip. Thanks to the Office RibbonX Editor we do not have to do all this to add or edit the customUI.xml or CustomUI14.xml file inside your Excel file.
Note: You will notice that Excel versions 2010 and up use the same xml file named customUI14.xml
When you do not work with things that are added in Excel 2010 and up (like Backstage View for example in Win Excel), then you can only use the Office 2007 Custom UI Part option to add your RibbonX, it will load the RibbonX from this file when you open the Excel file in every Excel version. But if you open the Excel file in Excel 2010 and up and there is also a customUI14.xml file it will load only this file.
For Mac Excel I suggest that you use the customUI14.xml file to insert your RibbonX, this is also the place that you will use for Excel 2016 and higher for Windows.
Note: It is not possible to insert RibbonX into Excel 97-2003(xls) files.
Open the Office RibbonX Editor

- Open : Open the Excel file that you want to edit (Be sure it is not open in Excel)
- Save : Save the RibbonX in the file that you have open in the UI editor(not possible to save when the file is open in Excel)
- Insert Icons : Insert your own icons in the file (icons will be saved in the file)
- Validate : Validate your RibbonX so you are sure that there are no typos
- Generate Callbacks : This will create macros(callbacks) for each onAction you have in the RibbonX. Select all callbacks and copy them in a normal module in your workbook.
- Reload on Save : This button have no use if you not have the file open in Excel when you open it in the editor, for more information about this button read the info on the download page.
When you open an Excel file in the Office RibbonX Editor you can right click on the file name and choose : Office 2007 Custom UI Part Or use Office 2010+ Custom UI Part. Or you can use the Insert menu in the Office RibbonX Editor.

It creates the customUI14.xml file if you choose Office 2010+ Custom UI Part and the customUI.xml file if you choose Office 2007 Custom UI Part. After you choose one option or both, you can enter or paste your RibbonX in the correct part.
Let's make an Example for Excel (Win and Mac)
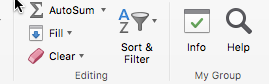
In this basic example we add RibbonX to a file that create two buttons in a new group named My Group on the Home tab when you open your file in Mac Excel 2016 and higher and Win Excel 2010 and higher.
- Open a new workbook and save it as Book1.xlsm (Excel Macro-Enabled workbook)
- Close the workbook
- Open Book1.xlsm in the Office RibbonX Editor
- Right click on the File name in the Office RibbonX Editor or use the Insert menu
- Choose "Office 2010+ Custom UI Part" to create the customUI.xml file
- Copy/Paste the RibbonX below in the right window
- Save your changes in the Office RibbonX Editor (click on the Save button)
- Close the Editor
- Open the File in Excel
- CMD F11 or in Windows Alt F11
- Insert Module
- Copy the two macros below in the Module
- Click on the Save button in the VBA editor
- Use CMD q or in Windows Alt q to close the VBA editor
- Test the workbook in Mac Excel 2016 or higher or Win Excel 2010 or higher
Note: You see that I use imageMso in the RibbonX to tell Excel which image I want to see on the button, but you can also use a custom image. In the Office RibbonX Editor you can use Insert Icons to insert your own icons, the icons will be saved in the file. Instead of imageMso you must use image now if you point to a custom image : image="imagename"
Information and Example files for Mac Excel
Custom Ribbon Example files
Download a few basic example files below (3 files)
Download example files
See also the download on this page with 5 example files
Hide, Display and Activate Ribbon Tab/Group with getVisible and ActivateTab
Tab and group idMso's of the Mac Excel Ribbon
Visit this page for more information:
Tab and Group idMso's
Control idMso's of the Mac Excel Ribbon
Visit this page for more information:
Ribbon Control idMso's
imageMso's that you can use in Mac Office
Visit this page for more information: Ribbon imageMso's in Mac Excel
Microsoft Information
Visit this page for the information that Microsoft have published : https://msdn.microsoft.com/en-us/library/office/mt654022.aspx