Important : The first 5 steps below are very important to read and follow before you can test the first mail macro in step 6. I hope I make it easy for you with the information on this page to add the mail code (Functions and macros) to your own workbook. It is not so easy as in Excel for windows but I got it working. Suggestions are welcome and also mail me if you got problems. Good luck.
There is no object model in VBA to talk to Apple Mail and the legacy "MacScript" VBA Command is severely limited by Apple’s sandbox requirements: it will not work correctly in most situations in Office 2016 and up. Instead, Microsoft added a new VB command "AppleScriptTask" that accesses and runs an AppleScript file located outside the sandboxed app. This new approach is not as convenient: with the MacScript function you could have the script in the file itself, while with the AppleScriptTask method you need to distribute an extra file containing the script, and it must be placed in the specified location on the user’s system to have permission to run. This requires some user interaction only the first time.
Download the script file :
RDBMacMail2.scpt
- Open a Finder Window
- Hold the Alt key when you press on Go in the Finder menu bar
- Click on Library
- Click on Application Scripts (if it exists; if not create this folder)
- Click on com.microsoft.Excel (if it exists; if not create this folder) note: Capital letter E
- Copy the RDBMacMail2.scpt script file from the download inside this folder
There is another easy way to create the folders without following the steps above, check out this page if you are interested.
Setup your Mac for Mac OfficeWith Excel open create an new workbook and save it as an xlsm file (Macro Enabled workbook) with the name you want. In my example I name the file TestFileMail.xlsm. To create a new file you can use in the menu File>New or you can use the shortcut Command n.
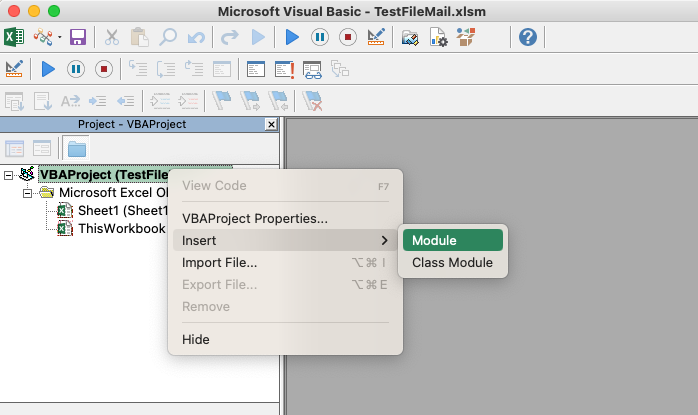
With your test workbook active press the shortcut Command F11 to open the VBE editor, now right click your VBAProject(TestFileMail.xlsm) and choose Insert > Module to create a module.
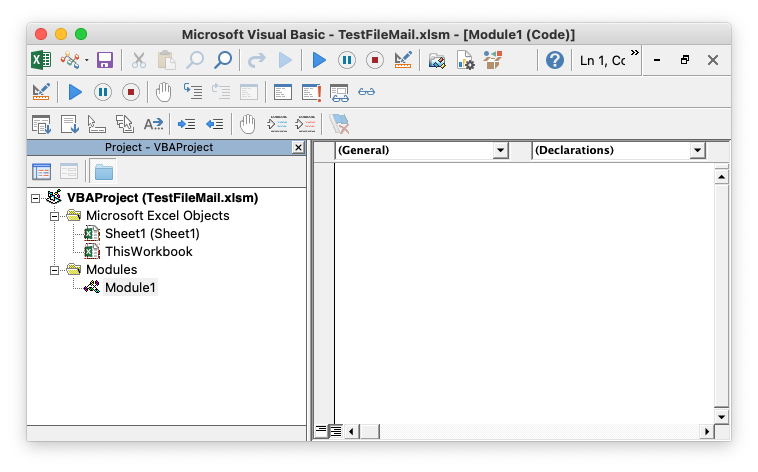
You will end up with this if you have done it correct :
Copy the 5 custom functions below that the macros will use inside Module1, click in the code block below and all code is selected and you can use Command c to copy and paste it inside Module1 with Command v. The custom functions will be used by the mail macros, the macro's will not work if they are not in the workbook.
I show you above how to add a module to your workbook and we have copy the 5 custom functions inside it, now we will add another module (Module2) that we will use for the macro's. Always important to organize your code so it is easier to find the things you need. You will notice that you will not have to edit the custom functions so it is easier that they are in a separate module. You can create a separate module for each example on this page so it is easy to find and if you want you can change the names of the Modules.
In the macro's below you see that we call the custom function named MacExcelWithMacMailCatalinaAndUp that we copy inside Module1 with three other functions to create the mail. I will explain you now what the arguments are and what you can do with them.
MacExcelWithMacMailCatalinaAndUp subject:="This is a test macro", _
mailbody:=strbody, _
toaddress:="ron@debruin.nl", _
ccaddress:="", _
bccaddress:="", _
displaymail:="yes", _
attachmentname:="MyFileWithActivesheet", _
pathotherattachments:="", _
thesignature:="", _
thesender:="", _
FileFormat:=Sourcewb.FileFormat
subject : String for the subject
mailbody : We build the strbody string inside the macro, see the macros examples below.
toaddress, ccaddress, bccaddress : With more mail addresses separate them with a ,
displaymail : yes display it and no sending it directly
Attachmentname : Name of the file with the active sheet for example without the extension, only used if you send the active sheet or sheets. In the PDF example you use the FilePathName variable, do not change that.
pathotherattachments : Attach other existing files in this format "/Users/rondebruin/Desktop/MyFile.xlsx" with more files separate them with a ,
thesignature : Look in Mail>Settings for the name of the signature, empty is using the default signature
thesender : Fill in the mail address of the account, see Mail>Settings for account information. Empty is using the default mail account
FileFormat : This optional argument is only used in the macro that send the active sheet or sheets, do not change Sourcewb.FileFormat
Below are three examples to add text to your mail :
- Text is in the macro code
- Cell reference
- Loop through range
Click in the code block below and all code is selected and you can use
Command c to copy and paste it inside
Module2 with
Command v. Be sure there is a sheet named "
Sheet1" with some data in The
A column and you can test the three macro's without changing them.
Note : I like to see my attachments and pdf view below my signature, if you want that also you can do this. On the Mail Menu, choose Edit > Attachments > Always Insert Attachments at End of Message (a checkmark shows it's on).
This macro create and display a mail with the active sheet as attachment, you can run it without changing the code to test it. Click in the code block below and all code is selected and you can use Command c to copy and paste it inside Module2 with Command v.
This macro create and display a mail with attached a existing file or files on your Mac, change the pathotherattachments argument to a path to a file on your Mac before running it. Click in the code block below and all code is selected and you can use Command c to copy and paste it inside Module2 with Command v.
The macro below will work on the ActiveSheet, so create a new worksheet in your test workbook and add some information in it like I show you below:
In column A : Names of the students
In column B : E-mail addresses
In column C : empty or no ( if the value is "no" it will not create a mail)
In column D : Grades Score like 80 or so
In column E : Comment line like Good Job
Test the code with two lines of data or so, it display the mail so you can check out the result. You can change the displaymail argument in the function call to no if you want to send it directly.
Click in the code block below and all code is selected and you can use Command c to copy and paste it inside Module2 with Command v.
Note : I like to see my attachments and pdf view below my signature, if you want that also you can do this. On the Mail Menu, choose Edit > Attachments > Always Insert Attachments at End of Message (a checkmark shows it's on).
Below you find three macro's that create a mail with a PDF of the whole workbook, ActiveSheet or Range, you can test them without changing. See the text mail examples above for examples how to change the mail body string named strbody. Click in the code block below and all code is selected and you can use Command c to copy and paste it inside Module2 with Command v.